一、DockerCompose理解
Docker Compose is a tool that was developed to help define and share multi-container applications. With Compose, we can create a YAML file to define the services and with a single command, can spin everything up or tear it all down.
The big advantage of using Compose is you can define your application stack in a file, keep it at the root of your project repo (it’s now version controlled), and easily enable someone else to contribute to your project. Someone would only need to clone your repo and start the compose app. In fact, you might see quite a few projects on GitHub/GitLab doing exactly this now.
Docker compose 是来管理多个容器的一个工具。
1、安装Docker Compose Docker-compose地址
1.1 创建cli-plugins 目录 1 2 3 4 # 在github上下载最新版docker-compose ,放在 docker安装用户家目录下 :root/.docker/cli-plugins cd .docker mkdir cli-plugins
1.2 将下载的docker-compose-linux-amd64 改名为 docker-compose 1 2 # 在root/.docker/cli-plugins 目录下 mv docker-compose-linux-amd64 docker-compose
1.3 添加执行权限 1 chmod +x root/.docker/cli-plugins/docker-compose
1.4 安装低版本 1 2 3 4 5 6 curl -L https://get.daocloud.io/docker/compose/releases/download/1.29.2/docker-compose-`uname -s`-`uname -m` > /usr/local/bin/docker-compose sudo chmod +x /usr/local/bin/docker-compose docker-compose --version
v2.0.0版本命令为 docker compose 中间没有横杠
2、Docker Componse 官网示例(创建一个Python web应用): 2.1、创建app.py 1 2 3 4 5 6 7 8 9 10 11 12 13 14 15 16 17 18 19 20 21 22 23 import timeimport redisfrom flask import Flaskapp = Flask(__name__) cache = redis.Redis(host='redis' , port=6379 ) def get_hit_count (): retries = 5 while True : try : return cache.incr('hits' ) except redis.exceptions.ConnectionError as exc: if retries == 0 : raise exc retries -= 1 time.sleep(0.5 ) @app.route('/' def hello (): count = get_hit_count() return 'Hello World! I have been seen {} times.\n' .format (count)
2.2、创建包文件夹 requirements.txt: 2.3 创建Dockerfile文件 1 2 3 4 5 6 7 8 9 10 11 12 13 14 FROM python:3.7-alpine RUN sed -i -e 's/http:/https:/' /etc/apk/repositories WORKDIR /code ENV FLASK_APP=app.py ENV FLASK_RUN_HOST=0.0.0.0 RUN apk add --no-cache gcc musl-dev linux-headers COPY requirements.txt requirements.txt # RUN pip install -r requirements.txt # 指定清华源 下载快 RUN pip install -i https://pypi.tuna.tsinghua.edu.cn/simple --no-cache-dir -r requirements.txt EXPOSE 5000 COPY . . CMD ["flask", "run"]
2.4 创建 docker-compose.yml文件 : 1 2 3 4 5 6 7 8 version: "3.9" services: web: build: . ports: - "5000:5000" redis: image: "redis:alpine"
2.5 在 docker-compose.yml 目录下运行命令 出现错误 :
解决:在Dockerfile中添加下面这个命令
1 2 3 4 5 6 7 8 9 10 11 12 13 14 15 16 17 18 RUN sed -i -e 's/http:/https:/' /etc/apk/repositories # 完整的Dockerfile: FROM python:3.7-alpine RUN sed -i -e 's/http:/https:/' /etc/apk/repositories WORKDIR /code ENV FLASK_APP=app.py ENV FLASK_RUN_HOST=0.0.0.0 RUN apk add --no-cache gcc musl-dev linux-headers COPY requirements.txt requirements.txt # RUN pip install -r requirements.txt # 指定清华源 下载快 RUN pip install -i https://pypi.tuna.tsinghua.edu.cn/simple --no-cache-dir -r requirements.txt EXPOSE 5000 COPY . . CMD ["flask", "run"]
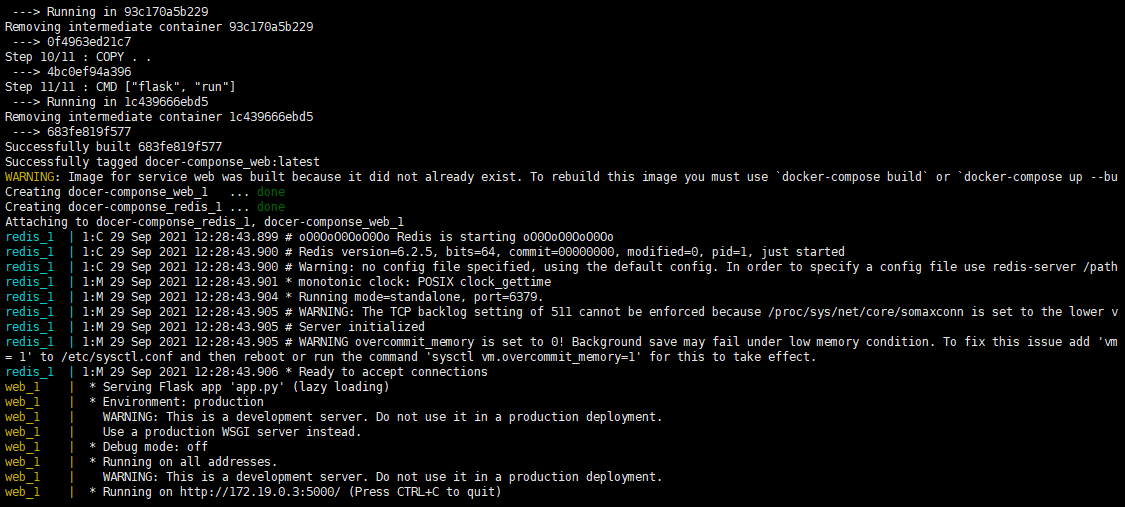
2.5 运行成功
二、docker compose 命令详解 结合docker compose 部署多个服务
1 2 3 4 5 6 7 8 9 10 11 12 13 14 15 16 17 18 19 20 21 22 23 24 25 26 27 28 29 30 31 32 33 34 35 36 37 38 39 40 41 42 43 44 45 46 47 48 49 50 51 52 53 54 55 56 57 58 59 60 61 62 63 64 65 66 67 68 69 70 71 72 73 74 75 76 77 78 79 80 81 82 83 84 85 86 87 88 89 90 91 92 93 94 95 96 97 98 99 100 101 102 103 104 105 106 107 108 109 110 111 112 113 114 115 116 117 118 119 120 121 122 123 124 125 126 127 128 129 130 131 132 133 134 135 136 137 138 139 140 141 142 143 144 145 146 147 148 149 150 151 152 153 154 155 156 157 158 159 160 161 162 163 164 165 166 167 168 169 170 171 172 173 174 175 176 177 version: "3" services: my_tomcat2: container_name: tomcat2 image: tomcat restart: always ports: - "8082:8080" volumes: - "./env/webapps:/usr/local/tomcat/webapps" networks: - hello depends_on: - my_mysql - my_redis healthcheck : test: [ "CMD" ,"curl" ,"-f" ,"http://localhost" ] interval: 1 m30s timeout: 10 s retries: 3 my_mysql: image: mysql:5.7 container_name: mysql privileged: true restart: always ports: - "3306:3306" volumes: - "./env/mysql/conf.d:/etc/mysql/conf.d" - "./env/mysql/mysqldata:/var/lib/mysql" - "./env/mysql/mysqllogs:/logs" env_file: - ./env /mysql/mysql.env command: --wait_timeout=31536000 --interactive_timeout=31536000 --max_connections=1000 --default-authentication-plugin=mysql_native_password networks: - hello my_redis: image: redis container_name: redis restart: always ports: - "6379:6379" expose : - "6379" volumes: - ./env /redis/data:/data - ./env /redis/conf:/usr/local/etc/redis - ./env /redis/logs:/logs command: redis-server /usr/local/etc/redis/redis.conf networks: - hello nginx: container_name: nginx restart: always image: nginx:1.11 .6 -alpine ports: - "8080:80" - "80:80" - "443:443" volumes: - ./env /nginx/conf.d:/etc/nginx/conf.d - ./env /nginx/logs:/var/log/nginx - ./env /nginx/www:/var/www - /etc/letsencrypt:/etc/letsencrypt networks: - hello portainer: image: portainer/portainer container_name: portainer volumes: - /var/run /docker.sock:/var/run/docker.sock - /opt/portainer/data:/data ports: - 8000 :8000 - 9000 :9000 networks: - hello networks: hello: external: false
三、安装Portainer是Docker可视化软件 1 2 3 4 5 6 7 8 9 10 docker pull portainer/portainer docker run -p 9000:9000 --name=portainer --restart=always -v /opt/portainer/data:/data -v /var/run/docker.sock:/var/run/docker.sock portainer/portainer docker run --name=portainer -p 9000:9000 --restart=always -d --rm -v /var/run/docker.sock:/var/run/docker.sock -v /opt/portainer/data:/data registry.cn-shenzhen.aliyuncs.com/infrastlabs/portainer-cn


 微信
微信 支付宝
支付宝